Intro
Welcome to Part 2 of the NSX-T AVI/ALB Lab In the previous post, we covered the architecture of Avi
In this post we’ll cover the required vCenter and NSX-T Permissions and users.
Overview
Rather than using the generic vSphere or NSX-T admin accounts for permissions for Avi which would work, it’s best practise to configure service accounts with limited permissions instead.
This accounts will need permissions in both vCenter and NSX-T for deploying to an NSX-T cloud. You could use the same account if your vCenter is AD integrated or using vIDM/Workspace one.
We’ll create two roles in vCenter both will be applied to the same user but in two different ways the global role is assigned directly to the user the folder role is assigned on the folder where we will place the SE’s.
If you don’t want to restrict VM operations to a folder and wants to assign the permissions globally, a single AviRole can be created with all the permissions we will configure and then applied as Global Permissions instead of creating the Avi Global and Folder roles. For this guide we will be creating two separate roles.
vCenter Roles Creation.
Avi Global Role
This role applies Global Permissions. It allows the user to upload the Service Engine OVF file to the content library (which we will create later), allocate space on a datastore to create a VM and assign networks to it.
First off login to the vCenter with an admin user or one that can create permissions users and roles. Navigate to Administration/Access Control/Roles then click on the + button.

Select Content Library and tick the following items
- Add library items
- Delete library items
- Update files
- Update library items

Next select Datastore select
- Allocate space
- Remove file

Next go to Network and select
- Assign network
- Remove

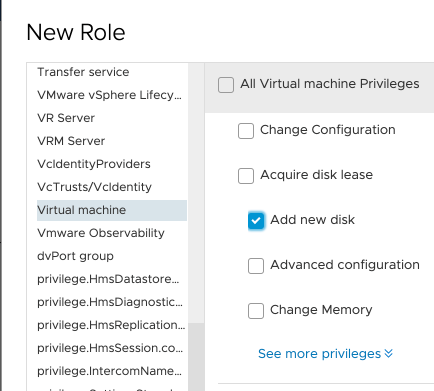
Under Virtual Machine select
- Change Configuration
- Add new disk

Finally under vAPP select
- Import

Click Next and give the role a name then click Finish

Avi Folder Role
The second role will be assigned to the Avi user at the folder level we will create the folder later. Click the + again to add a new role. Go to Folder and select
- Create Folder

Next under Network select
- Assign network
- Remove network

Select Resource and tick
- Assign virtual machine to resource pool

Under Tasks select
- Create tasks
- Update tasks

Next up is Virtual Machine which is a big one
- Change Configuration
- Add existing disk
- Add new disk
- Add or remove device
- Advanced configuration
- Change CPU count
- Change Memory
- Change Settings
- Change resource
- Display connection settings
- Extend virtual disk
- Remove disk
- Edit Inventory
- Create new
- Remove
- Interaction
- Connect devices
- Install VMware Tools
- Power off
- Power on
- Provisioning
- Allow disk access
- Allow file access
- Allow read-only disk access
- Deploy template
- Mark as virtual machine


Finally for vApp select
- Add virtual machine
- Assign resource pool
- Assign vApp
- Create
- Delete
- Export
- Import
- Power off
- Power on
- vApp application configuration
- vApp instance configuration


Go ahead and click Next enter a name and click Finish

Assigning The Roles
Global Role
After all that we have our two roles so now we need to assign them, for simplicity we’ll use the local vsphere.local to do this but you could also use an AD account if the VC is integrated.
First let’s create a new user go to Single Sign on and then Users and Groups make sure the Domain vSphere.locall or your equivalent is selected from the drop-down and click ADD USER

Enter a Username and Password then click ADD

Now go to Access Control and then Global Permissions and click +
Make sure the correct domain is selected enter the username and then select the Global Role from the dropdown, and tick Propagate to Children the click ADD.

Folder Role
Lets create the folder where the Service Engines will live go to the VMs and Templates page in the vCenter right click the DC and select New folder then New VM and Template Folder give it and name click click OK
then select the folder and go to the Permissions tab and click the +

The same process as before only this time select the folder role.

NSX-T Permissions
Luckily the NSX-T permissions are alot simpler however you’ll need an identity source configured as local users are not allowed for a guide on how to integrate NSX-T with AD see my post here https://vdives.com/2020/12/24/nsx-t-ldap-configuration/ I’ve configured a user thats a member of the NSX-T Admin group on AD.
On your NSX-T manager navigate to System, Users and Roles then click Add, Role Assignment for LDAP

Now the Avi documentation states to assign the Network Engineer role this is also referred to in the VMware docs however my lab is running 3.1 and this role does not exist the same role is now called Network Admin, so select the correct domain from the list then select the correct user and then the Network Admin/Engineer role and click SAVE.
The Avi documentation states to use this role as custom roles are not in NSX-T 3.0 this however is not the case with NSX-T 3.1 where custom roles can now be created however at the time of writing this there is no definitions of the required permissions for NSX-T so creating a custom role for Avi is still not possible.

With that we are done with the permissions and now we need to setup a content library to allow the automated deployment of our SEs.
AVI/ALB NSX-T Lab Part 3: – vCenter Content Library
